CPU Temperature
CPU temperature monitoring is vital for administering a system, especially when it comes to server maintenance. With Raspberry Pi being widely used as a home server, completing this tutorial will provide you a way of checking CPU temperature of your Raspberry Pi through a webpage.
Retrieving CPU temperature
First of all, you need to get access to a terminal on your Raspberry Pi. This can be done by creating an SSH connection to it, or by executing LXTerminal application while using Graphic User Interface. Now, run the following command:
/opt/vc/bin/vcgencmd measure_temp
Example output:
temp=40.6'C
Create a Shell script that prints temperature to console
A shell script is a computer program that contains commands otherwise executed one-by-one by a shell (i.e. Bash), also known as a command-line interface/interpreter (CLI).
During this tutorial, two shell scripts will be developed.
The first one will be used to:
- Create a Round Robin Database
- Retrieve CPU temperature and store it in the database &
- Create a webpage to display the logged data
The second one will be used to:
- Graphically represent the data stored in the database
Both scripts will be executed by Bash (Bourne Again SHell), a Unix-like shell available on Raspbian.
Take a look at the following code:
#!/bin/bash

TEMP_READING=$(/opt/vc/bin/vcgencmd measure_temp)
TEMP_VALUE=${TEMP_READING:5:4}
echo ${TEMP_VALUE}
What it does:
TEMP_READING: A variable that is assigned the output of the command retrieving CPU temperature (i.etemp=40.6'C). In Bash, $(<command>) is replaced with the output of <command>.TEMP_VALUE: A variable that is assigned the numerical value of the temperature (i.e.40.6). This is done using string manipulation. In Bash,${str:pos:len}extracts a substring oflencharacters from stringstr, starting at positionpos.echo: A command that prints the contents ofTEMP_VALUEvariable to console.
As you can see, when assigning a value to a variable only the name of the variable is used. On the other hand, using the $ symbol is required to retrieve the value of a variable. $MYVAR has the same effect as ${MYVAR}.
To test the code above store it in a file (i.e. get_temp.sh) and execute it by running: ./get_temp.sh. If you encounter a Permission denied message, run chmod 700 get_temp.sh before executing again.
Create a Round Robin Database
A Round Robin Database (RRD) is a time series database. RRD expects data to be stored in it at given intervals (step). If no value is supplied during an interval, NaN (UNKNOWN) is stored.
Creating a database to store CPU temperature:
rrdtool create cputemp.rrd \
	--start now \
	--step 60 \
	--no-overwrite \
	DS:cpu_temp:GAUGE:120:U:U \
	RRA:AVERAGE:0.5:1:535680
Don’t get confused by \ character. It is used to let the shell know that the following line is part of the current command.
In simple terms, the rrdtool create command above creates a RRD named cputemp.rrd that:
- Starts “accepting” values since
now. - Stores one value every 60 seconds (
--step 60). - Refers to the set of provided values as
cpu_temp. - Has enough space to store 535680 values (= 12months * 31days * 24hours * 60minutes).
- Calculates and stores the average, in case multiple values are supplied during the same interval (= 60 seconds).
Attention: No action takes place if the database already exists (--no-overwrite).
Documentation of rrdtool create can be found here.
Store data in a RRD
Storing data in a RRD is extremely simple and it is done by rrdtool update command.
The command below stores value 7 in cputemp.rrd:
rrdtool update cputemp.rrd 1412800000:7
1412800000 is the number of seconds since 1970-01-01 00:00:00 UTC (Unix/Epoch time) and you can use the term Timestamp to refer to it.
To find out current time in Epoch time, run date +%s.
The rrdtool update command using current timestamp:
rrdtool update cputemp.rrd $(date +%s):7
Documentation of rrdtool update can be found here.
Graphically represent data stored in a RRD
Fetching data from a RRD and plotting them can be done with rrdtool graph command.
Creating a graph depicting CPU temperature:
rrdtool graph graph.png \
	--start -2h \
	--title "CPU Temperature Log" \
	--vertical-label "Temperature ºC" \
	--width 600 \
	--height 200 \
	--color GRID#C2C2D6 \
	--color MGRID#E2E2E6 \
	--dynamic-labels \
	--grid-dash 1:1 \
	--font TITLE:10 \
	--font UNIT:9 \
	--font LEGEND:8 \
	--font AXIS:8 \
	--font WATERMARK:8 \
	--lazy \
	--watermark "$(date -R)" \
	DEF:cpu_temp=cputemp.rrd:cpu_temp:AVERAGE \
	AREA:cpu_temp#FF0000AA:"RPi CPU" \
	LINE2:cpu_temp#FF0000
Very briefly, the rrdtool graph command above creates a PNG file named graph.png that:
- Graphically represents the data stored the last 2 hours (
--start -2h) & cpu_tempis the set of data that is plotted.
All other options are mainly used for configuring the appearance of the graph. If you are interested in learning more about the available options refer to documentation.
Output of rrdtool graph:
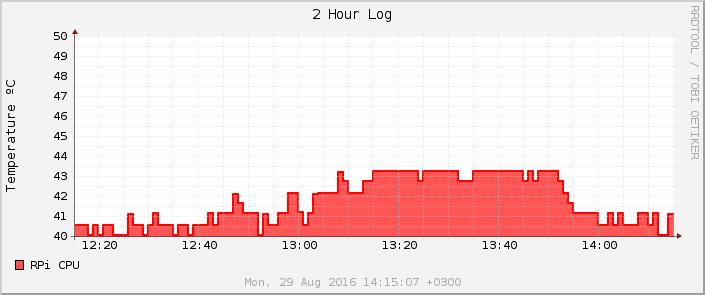
Documentation of rrdtool graph can be found here.
Bash: Output redirection
Running echo "Hello World" will print Hello World to console. In Bash, you can redirect that output to a file.
Executing echo "Hello Raspberry Pi fans!" > hello.txt will create file hello.txt and its contents will be set to match Hello Raspberry Pi fans!. If the file already exists, it will be truncated. Similarily, you can create an HTML file by echo-ing and redirecting output to it.
Another way of redirecting output to a file is the following:
cat > index.html << __EOF__
<!DOCTYPE html>
<head>
<title>RPi CPU Temperature</title>
<meta charset="UTF-8">
<style>
html {
text-align: center;
background: radial-gradient(circle, #DCDFEF, #7886C4);
}
body {
width: 910px;
margin: auto;
}
</style>
</head>
<body>
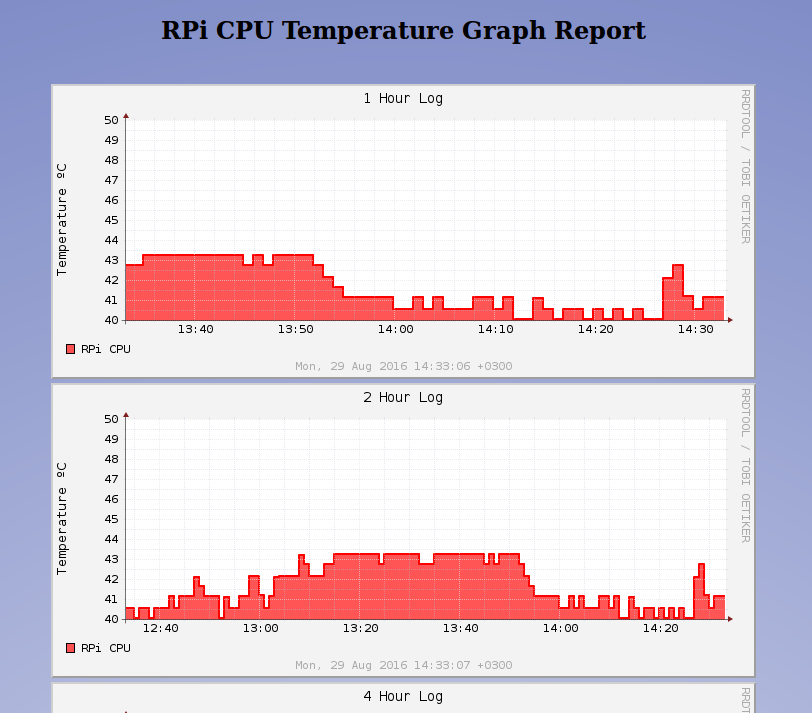
<h2>RPi CPU Temperature Graph Report</h2><br>
<img src="./00-temp-1h.png" alt="00-temp-1h.png">
<img src="./01-temp-2h.png" alt="01-temp-2h.png">
<img src="./02-temp-4h.png" alt="02-temp-4h.png">
<img src="./03-temp-12h.png" alt="03-temp-12h.png">
<img src="./04-temp-24h.png" alt="04-temp-24h.png">
<img src="./05-temp-1w.png" alt="05-temp-1w.png">
<img src="./06-temp-4w.png" alt="06-temp-4w.png">
<img src="./07-temp-24w.png" alt="07-temp-24w.png">
<img src="./08-temp-1y.png" alt="08-temp-1y.png">
</body>
</html>
__EOF__
The code above writes the lines between the two __EOF__s to index.html file, which will later be used to display the graphs created by rrdtool graph.
Bash: Conditional execution
During this tutorial you are going to need the following conditionals:
1.
ONE_PATH="/var/www/html"
if [ -d ${ONE_PATH} ]
then
	<commands>
fi
Condition [ -d ${ONE_PATH} ] is assessed to “true” if ONE_PATH exists and is a directory, while [ ! -d ${ONE_PATH} ] is assessed to “false” if ONE_PATH exists and is a directory. As you may have guessed, the exclamation mark is used to invert a condition.
2.
ONE_FILE="/var/www/html/index.html"
if [ -e ${ONE_FILE} ] && [ -s ${ONE_FILE} ]
then
        <commands>
fi
Condition [ -e ${ONE_FILE} ] && [ -s ${ONE_FILE} ] is assessed to “true” if both conditionals beside && are assessed to “true”.
[ -e ${ONE_FILE} ]: “true” ifONE_FILEexists.[ -s ${ONE_FILE} ]: “true” ifONE_FILEhas size greater than 0.
3.
<one-command>
if [ $? -eq 0 ]
then
        <commands>
fi
Condition [ $? -eq 0 ] is assessed to “true” if the exit code of the previous command (i.e. <one-command>) equals 0 (command exited w/o errors).
Bash: Loops and Arrays
Take a look at the following code:
INDEX=0
INTERVALS="1h 2h 4h 12h 24h 1w 4w 24w 1y"
TITLES=('1 Hour' '2 Hour' '4 Hour' '12 Hour' '24 Hour' '1 Week' '1 Month' '6 Month' '1 Year')
for interval in ${INTERVALS}
do
	echo "${INDEX} ${interval} ${TITLES[$INDEX]}"
	((INDEX += 1))
done
Explaining the above code:
- The
forloop above will iterate over the string held inINTERVALSvariable. Therefore, the value ofintervalwill match 1h during the first iteration, 2h during the second and so on, until it reaches 1y. INDEXis used to count the number of loop iterations.((INDEX += 1))does the obvious; incrementsINDEX.${TITLES[$INDEX]}accesses theINDEX-th element of arrayTITLES
Bash: Functions
Function definition:
funcname () {
	<commands>
}
Function call w/o parameters:
funcname
Function call with parameters:
funcname 20 "Pi" "Hello"
In function body, refering to parameters is done by $ followed by a number (i.e. $1 refers to the first parameter).
Bringing it all together
Bringing all the stuff you learned together, results to the following shell scripts:
Execution using Crontab
Crontab allows you to automatically execute a comand or a shell script at given intervals.
Run crontab -e to edit current crontab file. The very first time you will be prompted to choose the editor of your choice.
Assuming that you saved the two shell scripts found above in /root/bin directory, add the following entries at the end of the file:
* * * * * /root/bin/log-cputemp.sh
* * * * * /root/bin/graph-cputemp.sh
in order for both scripts to be executed every minute. Save changes and exit.
Monitoring temperature through a browser
First, you need to now the IP address of your Raspberry Pi by running hostname -I.
Example output:
192.168.1.16
In this case the webpage URL you should visit is: http://192.168.1.16/cpu-temp
What next?
While taking a look at log-cputemp.sh and graph-cputemp.sh you may have noticed that in main function there are the following two variables declared:
WWW_DATA="/var/www/html/cpu-temp"
RRD_DATA="/var/www/html/cpu-temp"
WWW_DATA: the directory where theindex.htmlandPNGfiles will be stored.RRD_DATA: the directory where the Round Robin Database will be located.
Currently, everything is stored under /var/www/html/cpu-temp.
You are free to modify the directory paths at your discretion, as long as WWW_DATA begins with the /var/www/html prefix.
This happens because /var/www/html is the DocumentRoot of Apache. To put it simply, if you request http://192.168.1.16/page.html, Apache will respond with the contents of /var/www/html/page.html.
More information on apache2 can be found here.
Attention: The value of WWW_DIR and RRD_DIR should be the same in both shell scripts.
Note: Apache’s DocumentRoot directory was /var/www in Raspbian Wheezy but is now /var/www/html in Raspbian Jessie.